Cookie Compliance adds a consent banner to your site, enforces choices at runtime, and records decisions for audit. You’ll create a property (domain) in the application, connect your site (WordPress plugin or manual snippet), publish, and verify that non-essential services stay paused until visitors choose..
Step 1 — Create your property (domain)
- Sign in to the Cookie Compliance application and Add domain.
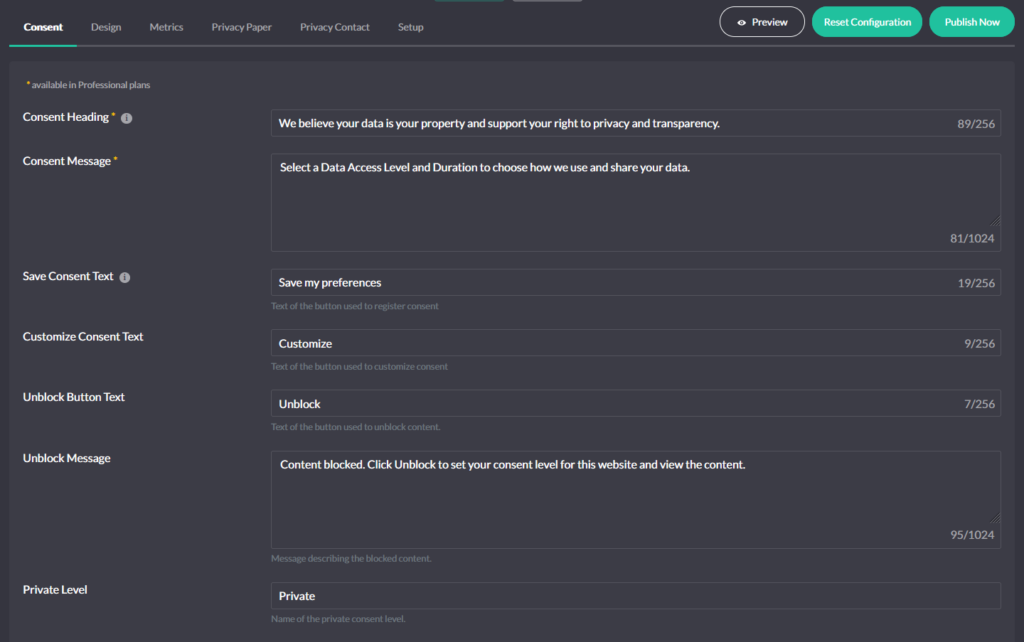
- Open Configuration and set the essentials you want live on day one:
- Access Levels (Private, Balanced, Personalized)
- Purpose Categories (Basic Operations, Site Optimization, Content Personalization, Ad Personalization)
- Languages (English is provided; add domain languages and fill their strings)
- Default consent level and Duration (how long a choice stays valid before asking again)
- Geolocation defaults if you vary the starting posture by region
- Options such as Revoke Consent visibility, Privacy Policy link, and GPC support (if your policy honors it)
- Click Publish Now in Configuration to activate the property.
Publishing first prevents “Pending/Inactive” states when you connect the site.
Step 2 — Connect your site
WordPress (Cookie Notice & Compliance plugin)
If you have performed the integration from WordPress, open the plugin settings, Cookie Consent page. Make sure that the App ID / Secret Key fields are filled in and click Save Changes to complete the integration process.
If statuses still show Pending/Inactive, copy the App ID and App Key from the application’s Integrations page and paste them into the plugin, then Save Changes again.
Manual implementation (any platform)
From Integrations, copy the generated snippet and paste it at the very top of <head>—inline init first, then the loader from our CDN. Keep both before any tag manager, analytics, or ad pixels.
It would look lie this:
<!-- Cookie Compliance: inline init -->
<script>
  var huOptions = {
    "appID": "YOUR_APP_ID",
    "currentLanguage": "en",
    "blocking": true
    "globalCookie": false
  };
</script>

<!-- Cookie Compliance: loader -->
<script src="https://cdn.hu-manity.co/hu-banner.min.js"></script>
Step 3 — Verify the banner and enforcement
Load the site as an anonymous visitor (logged out or in a clean session).
You should see:
- The banner on first visit in the expected language.
- No non-essential requests before a choice.
- After selecting Private, only Basic Operations run.
- After selecting Balanced or Personalized, only the purposes you mapped for that level run.
- The Revoke Consent control available if you enabled it.
In Consent Logs, confirm a new Cookie Consent entry with the selected Access Level and the purpose switches at that moment. Use Export CSV or a Proof of Cookie Consent report when you need evidence.
Configure what visitors actually see
Access Levels & Purposes
Decide what Balanced should allow (for example, “measurement only” vs “measurement + on-site personalization”) and set the Purpose Categories to match. The banner shows clear labels; Autoblocking and integrations enforce the mapping.
Languages
English ships complete. Add every language you serve in Languages, fill the text strings (banner title/description, buttons, Access Level labels, Purpose names/descriptions, policy links, duration labels), and Publish. The banner falls back to English for any missing text. WordPress sites select the language from the page’s locale and work with WPML, Polylang, and TranslatePress.
Geolocation
Use Automatic or Manual Geolocation to set regional defaults such as Banner Display, Revoke option, Autoblocking on/off per zone, and policy links. These are starting rules; the visitor’s choice decides what actually runs.
Consent Modes
Enable the consent modes you use—Google, Meta (Facebook), Microsoft—so their tags read the same state the banner maintains. Tags stay constrained before consent and expand only after visitors accept the relevant purposes.
GPC support
If your policy honors Global Privacy Control, enable it. Sessions start protected: sale/sharing-related purposes (typically Ad Personalization) stay off until a visitor explicitly opts in.
Common “Getting Started” issues (and fast fixes)
Status is Pending/Inactive → Publish in the application, then Save Changes in the WP plugin; if needed, paste the correct App ID/Key from Integrations.
Banner doesn’t appear → Ensure the inline init and loader sit first in <head>; disable aggressive JS optimization for our scripts; verify Banner Display = On for the visitor’s zone.
Vendors fire before consent → Review Provider patterns in Autoblocking and confirm they map to the right Purpose Categories; keep our scripts ahead of GTM/analytics.
Language mismatch → Add that language and strings in the application; publish; in WP, Save Changes; clear site/CDN caches.