When you upgrade your domain through WordPress, your banner is pre-configured with Default Settings based on the latest guidelines from over 100+ countries, and emerging standards from leading international organizations like the IEEE.
Step 1
Configure your Banner
Go to your Configuration page and click “Publish” now to ensure the default banner is active on your site before customizing your installation.
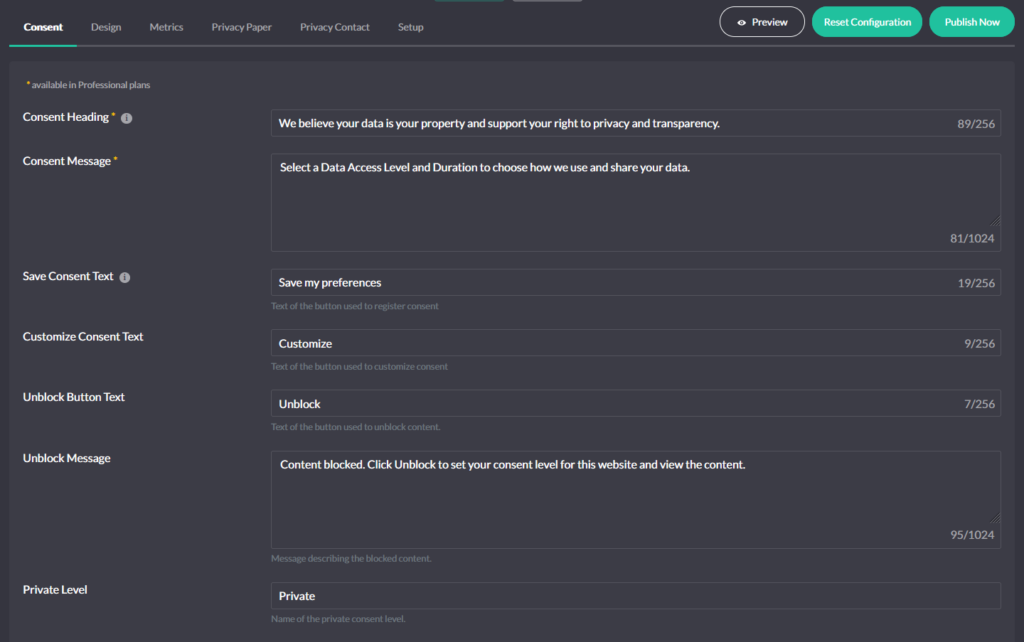
Explore and populate the sections in the Configuration page
- Consent: contains the most important settings regarding how the banner works, when, for whom and what banner elements are displayed, and how user consent is collected
- Design: allows you to specify the appearance of the banner – display position on the page, colors and animations to match your preferences and the look of your website.
- Metrics: displays the visitor’s consent record and a list of blocked / allowed 3rd parties directly in the fully expanded level of the banner
- Privacy Paper: displays helpful data privacy and consent information to visitors
- Privacy Contact: allows you to provide contact information for a business’s data privacy admin, as well as helpful links to external data privacy resources
- Setup: here you will find a description of how to implement Cookie Compliance on your site
Publishing the new banner is as simple as clicking the Publish button on the Configuration page.
When you click Publish, the banner configuration is saved and the changes should become visible on your site. Once the banner is published, the application will begin capturing consent event data. Event data for number of visits, consent activity, and most common browser languages are displayed by default on the Dashboard.
Step 2
Check Autoblocking
Autoblocking is pre-configured with a database of service providers and URL patterns for cookie scripts and iFrames. You can add, edit, or delete Providers and URL patterns based on the services running on your domain.
Check the position of your Autoblocking script
Use the browser developer tools to access source code of your website and make sure the blocking script is placed just below the <head> tag. Your site may be using services that force their tracking script above our blocking script, which prevents it from properly blocking cookies.
The structure should look as follows:
<head>
    <!-- Cookie Compliance -->
    <script>// parameters here</script>
    <script type="text/javascript" src="//cdn.hu-manity.co/hu-banner.min.js"></script>
All other scripts should be placed below.
With enforcement of compliance violations increasing with each new law / guideline, we believe it is more important for us as a trusted consent vendor to do everything in our power to help you stay ahead of these laws and remove the risk to your business.
Step 3
Monitor your Consent Activity
After the banner is published on your domain, data will begin updating every hour on your Dashboard.
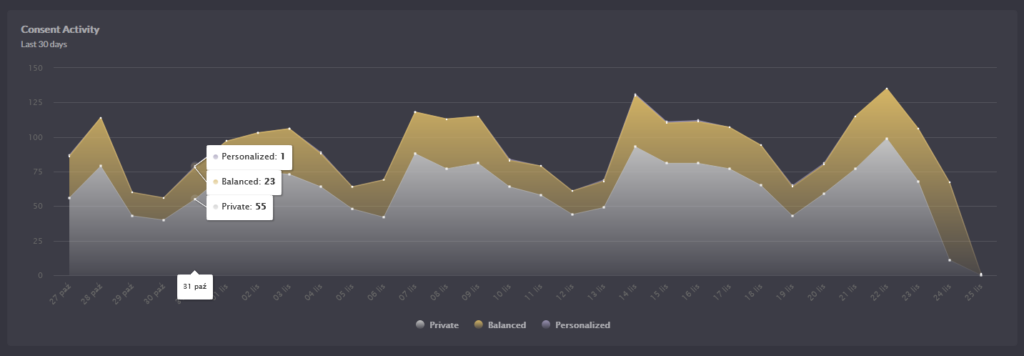
Check the Dashboard to see total number of visits on your domain, top languages of your visitors, banner accept rate, and more.